Toyota Tundra Oxygen Sensor Replacement
Jason Lancaster | Dec 08, 2014 | Comments 4
Oxygen sensors are tripped up by the smallest things, and can either cause an annoying check engine light to show on your gauge cluster, or can be the sole cause of your Tundra running like it is sick from the flu. Luckily, they are very easy to change, and can be done in a matter of minutes.
If you’re looking to remove and install one or more oxygen sensors on your Tundra, follow these six easy steps to get the job done quickly.
Required Tools
- Ratchet
- Oxygen sensor socket
- Box-end wrench
Caution: Ensure your Tundra is cool to the touch or you will subject yourself to the possibility of being burned by the hot exhaust pipes.
Step 1: Disconnect the negative battery cable from the battery and set it aside in a secure location.
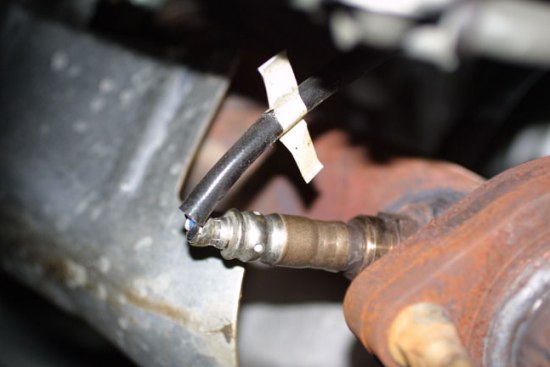
Step 2: Locate the soon-to-be replaced oxygen sensor, typically faulty oxygen sensors have white crusty residue on the sensor. Your Tundra will have one in front of the catalytic converter, and one behind it. If your Tundra has a dual exhaust system, there will be four oxygen sensors.
Step 3: Once you’ve located the faulty oxygen sensor, disconnect the wiring harness from the sensor. The harness will disconnect easily with your hands.
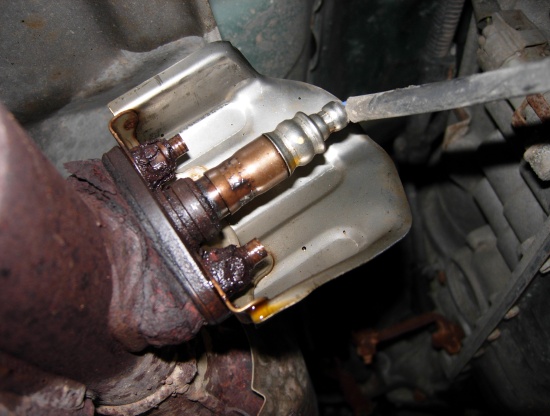
Step 4: After disconnecting the wiring harness, remove the oxygen sensor. Depending on which engine in your Tundra, you can either use a ratchet and an oxygen sensor socket to simply unthread the oxygen sensor from the exhaust bung, or use a box-end wrench to remove the mounting nuts and remove it from the exhaust.
Step 5: Once the old sensor is removed, install the new sensor.
NOTE: The new oxygen sensor may come with grease on the threads to ensure the sensor doesn’t get seized up in the sensor bung. If it doesn’t, it is recommended to apply anti-seize lubricant on the sensor threads. Be sure not to get any anti-seize on the sensor itself, which will cause issues with the sensor and its readings.
Step 6: Connect the wiring harness together with the pigtail on the new oxygen sensor. If you are replacing more than just one, follow the same process for each.
Step 7: Start your Tundra to ensure proper installation, and the check engine light does not appear on your dash. Once your Tundra has idled and warmed up, take it for a test drive to verify the check engine light or any other previous symptoms are not occurring.
That’s it! Now your Tundra will run efficiently and not get tripped up by any pesky oxygen sensors.
Search terms people used to find this page:
- tundraheadquarters
- https://tundraheadquarters com/toyota-tundra-oxygen-sensor-replacement/
- 2003 tundra check engine light oxygen sensor
- https://tundraheadquarters com/toyota-tundra-oxygen-sensor-replacement/#:~:text=Your Tundra will have one will be four oxygen sensors
Filed Under: Maintenance Tips


Exellent and useful article, many thanks!
If the O2 sensors are the cause of a check engine light, what would the diagnostic codes be?
Here’s most of them. I left out the many that would not currently apply (Sensor 3, etc).
Bank 1 is the bank where cylinder 1 is. In the 5.7L engine it’s the left bank (driver’s side) of cylinders.
Sensor 1 is closest to the exhaust port, and is most responsible for keeping air/fuel ratio within spec.
Sensor 2 is after the catalytic converter, and monitors converter efficiency.
P0130 02 Sensor Circuit Malfunction (Bank I Sensor 1)
P0131 02 Sensor Circuit Low Voltage (Bank I Sensor I)
P0132 02 Sensor Circuit High Voltage (Bank I Sensor 1)
P0133 02 Sensor Circuit Slow Response (Bank 1 Sensor 1)
P0134 02 Sensor Circuit No Activity Detected (Bank I Sensor 1)
P0135 02 Sensor Heater Circuit Malfunction (Bank 1 Sensor 1)
P0136 02 Sensor Circuit Malfunction (Bank I Sensor 2)
P0137 02 Sensor Circuit Low Voltage (Bank I Sensor 2)
P0138 02 Sensor Circuit High Voltage (Bank I Sensor 2)
P0139 02 Sensor Circuit Slow Response (Bank 1 Sensor 2)
P0140 02 Sensor Circuit No Activity Detected (Bank 1 Sensor 2)
P0141 02 Sensor Heater Circuit Malfunction (Bank 1 Sensor 2)
P0150 02 Sensor Circuit Malfunction (Bank 2 Sensor I)
P0151 02 Sensor Circuit Low Voltage (Bank 2 Sensor I)
P0152 02 Sensor Circuit High Voltage (Bank 2 Sensor 1)
P0153 02 Sensor Circuit Slow Response (Bank 2 Sensor 1)
P0154 02 Sensor Circuit No Activity Detected (Bank 2 Sensor 1)
P0155 02 Sensor Heater Circuit Malfunction (Bank 2 Sensor 1)
P0156 02 Sensor Circuit Malfunction (Bank 2 Sensor 2)
P0157 02 Sensor Circuit Low Voltage (Bank 2 Sensor 2)
P0158 02 Sensor Circuit High Voltage (Bank 2 Sensor 2)
P0159 02 Sensor Circuit Slow Response (Bank 2 Sensor 2)
P0160 02 Sensor Circuit No Activity Detected (Bank 2 Sensor 2)
P0161 02 Sensor Heater Circuit Malfunction (Bank 2 Sensor 2)
Steve
I should add that these are the GENERIC trouble codes for O2 sensors. Generic trouble codes number will begin with zero after the letter, as in the examples above, and are common to all vehicles.
Manufacturer-specific codes numbers will begin with the number one after the letter.
Steve
Thanks for the information. I made a copy of it for future reference.