Volant Snorkel Air Intake Review – Buyer Beware
Jamie Alberico | Feb 13, 2013 | Comments 9
We love it when an aftermarket accessory caresses the lines and increases the power of our Tundras. The Volant Snorkel stepped up to the challenge and then launched like a flailing space monkey into the annals as the one of the worst designs ever. Watch Rob mod the mod and earn his title of “zen master” in Tundra Headquarters presents:
Installs Gone Horribly Wrong: The Volant Snorkel

When Rob, TundraHeadquarter’s community manager, received the Volant Snorkel, his excitement was palpable. The Volant Snorkel is “designed” to fit his already existing Volant Cold Air Intake with just a little bit of cutting. Rob grabbed his camera and drove his 2010 Tundra over to Dents Unlimited in Columbia, Missouri to install his new toy.
Before You Install
Difficultly level: Advanced/Expert
Installation Time: 6 Hours
Custom Installation Labor: 6hrs @ $75 = $450 (Your cost will vary by location)
DIY Rating: 0. Do not attempt to install this piece by yourself unless you do your crosswords in pen. Even then, 2 people are needed to install the silicone sleeve between the Snorkel and CAI plate.
The Volant Snorkel Kit includes:
- (1) Snorkel Main Tube
- (1) Snorkel Breather/air scoop
- (1) Volant CAI air Box Coupling Plate
- (1) Mfg Provided Install Hardware – SS
- (1) Blue Silicone Coupling Sleeve
- Installation Instruction & Cutting Template
Installation Tools Required:
- Power Drill
- 4″ Hole Saw with Pilot Bit*
- Drill Bits – 1/8″ Pilot Holes, 5/16″ Final
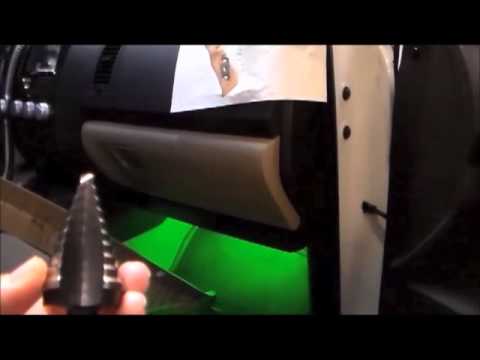
- Uni-bit – Step Bit – 3/4″ Cutout Required
- Allen Wrench Set
- 3/8″ Ratchet Set – 3″ EXT needed
*4″ Hole Saw not used in our installation due to body shop preferred choice Pneumatic Saw.
Before you read about the details below, be sure to check out this installation video that does a good job of showing the process as well as all the problems we found.
Step 1: Remove the fender flares and fender well. Pretty straight forward. Rob’s Tundra was already outfitted with Bushwacker fender flares.

Step 2: Tape and trace stencil, then cut an irreversible hole into the front quarter panel.  The manufacturer’s instructions call to use a 4” hole saw for cutting into the passenger’s fender. This odd size is difficult to find and expensive when you do. Steve, our helpful Master Technician, pointed out that hole saws created significant heat.
“Using a hole saw on painted body panels would likely cause the surrounding paint to blister do the heat.” Basically, the cup-shaped hole saw makes it difficult for heat to escape. If you’re not experienced with a hole saw– you’ll be in for a surprise: hole saws tend to wobble or “walk” to the centrifugal force. Rob and Steve decided to bypass the marred by paint by using a pneumatic saw, but thanks for setting the tone, Volant.
Step 2.5: Realize that no where in the instructions has Volant account for what to do with your fender flare. 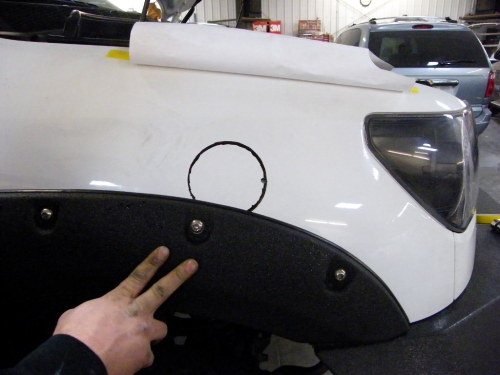 After making the 4th cut, Rob and Steve discovered that stencil placed the pathway for the Snorkel smack dab on the fender line. Rob’s Bushwacker fender flares aren’t exactly out of the ordinary. Tundras come with the option of OEM fender flares, but even this factor didn’t prompt Volant to address the common accessory in the instructions. Fender flares? What are those?
After realizing this damning error, Rob accessed the situation. In the end, three things persuaded him to continue with the install:
- Rob was at automative shop with a master technician.
- The Bushwacker flares were not painted.
- He had no idea how badly things were about to go.
Step 3: Attach coupling tube to Volant cold air intake.  Step 3.5: Realize that the coupling tube completely throws off the mounting points for the cold air intake.
After installing the Snorkel adapter plate on the CAI air box and attempting to wedge the assembly into the engine bay, Rob and Steve discovered that the fender mounting holes were off-center. With no way to re-install the CAI using the existing bolt holes, Steve drilled a new exit hole into the bottom of the air box. This allowed the mounting bolt to pass through and thread into the retainer. In all fairness, this difficulty may have been due to the Tundra’s pre-existing after-market throttle body, which just happens to have been made by Volant (see our review of Volant’s throttle body spacer here).
Either Volant failed to mention certain compatibility issues, or they didn’t think someone would buy more than one of their products.

Step 4: Attach the snorkel to the air box. Rob encourages those attempting to install Volant Snorkel to be patient and work on getting the piece into place. At this point, he’s already claimed his “calm and collected” merit badge.

Step 5: Install the threaded spikes that will serve as mounting point markers. Align the snorkel on your Tundra and hit the snorkel at the spike points to mark the paint.  Step 6: Drill the locations for the hardware on the front quarter panel.
 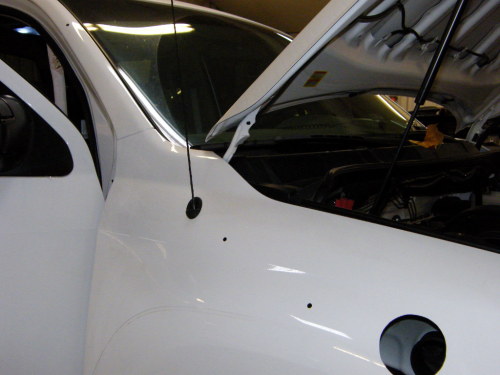 Step 7: Remove the (2) 10mm bolts from the A-pillar trim and pull out the assembly.
 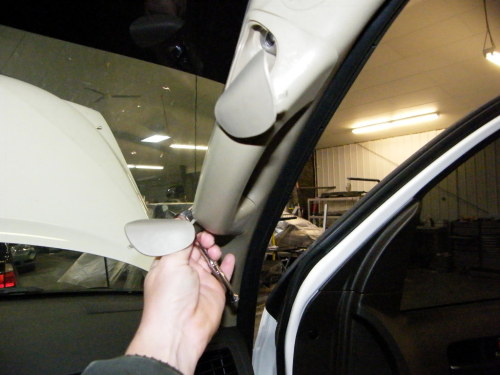 Step 8: Unbolt and move the air bag out of your way. Do not disconnect!
 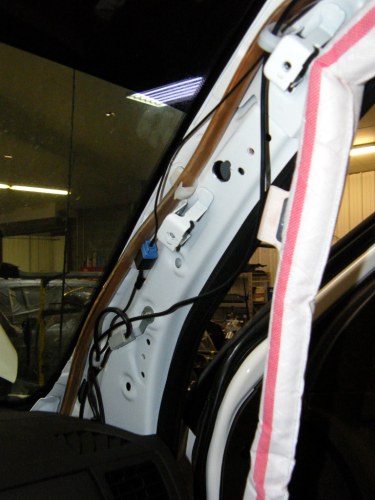 Step 9: Drill mounting holes in the A-pillar.
 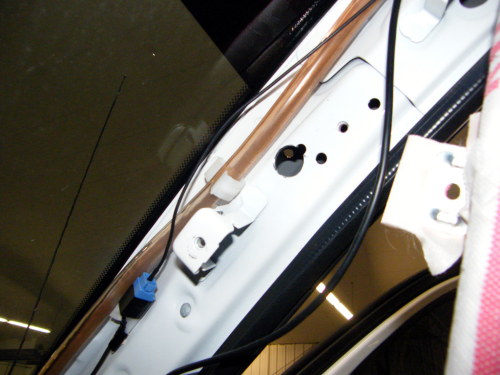 Step 10: From the inside, enlarge the holes in the A-pillar to 3/4” using a step-bit. The A-pillar is triple walled. You don’t want to go all the way through– you just need to gain access from the inside.

Step 10.5: Cut the alignment peg from your A-pillar. It just so happens to be in the exactly location you mounting hardware needs to go. Watch Rob’s zen-like reaction and attempt to replicate.
Yet again, there is no mention of this particular modification in the instructions.

Step 11: Coat the edges of the pre-drilled holes with rubberized sealant. Our helpful tech, Steve, sprayed aerosol sealant onto a piece of cardboard and then used a q-tip to apply.
Step 12: Insert the silicone sleeve to attach the Snorkel to the Cold Air Intake and tighten down hardware. The main Snorkel tube attaches via a silicone sleeve and SS clamps to the adapter plate to the CAI box. The instructions nonchalantly direct you to re-use the foam gasket previously used on the CAI box against the fender well opening.
Stop with us and contemplate this scene: You’ve purchased a Snorkel, a product designed to allow the driver to submerge into water without sucking the engine-seizing liquid into the engine. And then they told you to just use the foam gasket you already had.
We’ll state this simply with the hopes that some absented-minded engineer with read it: Foam is not water proof.

Step 12.5: Realize that the bolts included with the kit leave a Tebow-style gap between the Snorkel and your truck. Promptly grab your grinder and lop the bolts down to 1/2”. The ill-fitting bolts included in the Volant Snorkel kit are not only an aesthetic atrocity, but a structural concern. The bolts bottom out into embedded nuts on the snorkel as they pass through the mounting locations. As a result, the Snorkel jostled freely against the paint. Nothing screams classy like a destroyed paint and the potential for a chunk of your mod to rip off as your roll down the highway.
Step 13: Attach the top of the Snorkel.  Step 14: Reinstall fender well and fender flare. If you have Bushwackers or any other type of fender flare, cut them to fit around the Snorkel.
Step 15: If you see Rob at a bar, buy him a beer.
NOTE: We’re currently working on testing the air intake’s impact on performance. While we’re not quite ready to share numbers, this air intake does NOT improve performance over the stock intake.
Here’s our list of things designed better than the Volant Snorkel:
- The Superdome’s electrical system
- Fiat Multipla
- Apple Maps
- Windows Vista
- Pontiac Aztec
- My 4-year-old nephew’s LEGO tower
And here’s our list of lessons we’d like Volant to take away from this article:
- You should attempt to follow your installation instructions before publishing them.
- Hole saws and automative paint are not a combination for the inexperienced.
- Many Tundras have fender flares.
- Measure before you throw bolts in a bag.
- That alignment peg was placed there by a designer with significantly more expertise.
- Foam is not waterproof.
Search terms people used to find this page:
- tundraheadquarters
Filed Under: Toyota Tundra Accessories


Replace the Volant emblems with “Rob’s Mod”.
Seriously, Volant does not deserve the advertising, Rob does.
Kudos to Rob!
Cheers to that!
Great write-up, had me laughing. It’s sad though the lack of engineering that some these aftermarket company’s put into their products. It’s like they’re saying “oh you just figure it out!”
Thank you! We’d hate to see the nation’s number one employer of retired space monkeys go out of business, but we’d appreciate it if they didn’t torture unfortunate consumers.
What can you say about Volant. Glad I don’t have one. Man someone sure didn’t do their research on that snorkel. It seems they just wanted to get one out there and worry about it later.
Volant’s CAI has had a reputation for falling off the truck on several of the Tundra forums.
Looks to me like I could DIY that system with some plastic pipe and duct tape and get equal results.
I’m curious to know how the Tundra runs with it. Even better, put the Tundra on a dyno.
Not a lot of faith left in Volant at this point. We ran a Dyno after Rob installed the Volant Throttle Body Spacer. The difference really ended up being about 2 hours of Rob’s life and not a lot more.
As overpriced as their stuff is you’d think it would at least fit like a glove in all applications but there are figment issues with lots of their products.